ERP User Manual
Sales Overview
The Sales Overview page displays a comprehensive list of all recorded sales in a DataTable format. This allows users to efficiently track and manage each sale based on its key attributes and current status.
Key Columns Displayed
- Sale Status – Indicates the current state of the sale (e.g., Completed, Pending, Cancelled).
- Payment Status – Shows whether the payment is Paid, Partially Paid, or Unpaid.
- Delivery Status – Tracks if the order has been delivered, partially delivered, or not delivered.
- Payment Method – Displays the method used for payment (e.g., Cash, Card, Bank Transfer).
- Grand Total – The total amount of the sale.
- Paid – The amount already paid by the customer.
- Due – The remaining balance, if any.
- Actions – Options to view, edit, delete, print invoices, or manage delivery.
Features
- Filter and search sales by status, date, customer, and payment type.
- Export options available (Excel, PDF, Print).
- Supports pagination and column sorting.
 Figure 2: Sales Index View with Statuses and
Actions
Figure 2: Sales Index View with Statuses and
Actions
Add Sales
To create a new sale, click the Add Sale button on the Sales Index page (Figure
2)
 .
This action will open the Add Sale Form, where users can input all necessary
sale details.
.
This action will open the Add Sale Form, where users can input all necessary
sale details.
 Figure 3: Add Sale Form (Section 1)
The first section of the form allows users to configure general sale information. The following fields must be completed:
- Date – Select the sale date.
- Reference No. – Enter a unique reference number for the sale (can be auto or manual).
- Customer – Choose a customer from the searchable dropdown list.
- Warehouse – Select the warehouse from which the stock will be deducted.
- Biller – Select the staff member or department handling the billing.
- Currency – Choose the transaction currency.
- Exchange Rate – Enter or confirm the exchange rate if a foreign currency is selected.
Once general information is filled in, the user can add products to the sale. Products can be searched by product code or name. When a product is selected, the system automatically populates the product details into the Order Table.
The Order Table includes the following columns:
- Product Name and Code
- Quantity – Enter the number of units being sold
- Net Unit Price – System-calculated or editable based on permissions
- Discount – Apply discount per item (if any)
- Tax – Automatically applied based on settings
- Subtotal – Total for the item after discount and tax
Users can add multiple products to the list. The table footer will automatically calculate and display the overall totals including discount, tax, and subtotal for the transaction.
 Figure 4: Add Sale Form (Section 2)
The second section (Figrue 4) of the Add Sale Form contains fields to finalize the sale, apply discounts and taxes, and provide additional documentation or notes. The following inputs are available:
- Order Tax – Select applicable tax to be applied on the total sale amount.
- Order Discount
- Type – Choose between a flat amount or percentage discount.
- Value – Enter the discount value to be applied to the entire order.
- Shipping Cost – Input the delivery or shipping charges (if applicable).
- Attach Document – Upload related documents (e.g., invoice, reference form) in supported formats (PDF, DOC, PNG, etc.).
- Sale Status – Choose the current status of the sale (e.g., Pending, Completed).
- Payment Status – Select the payment progress (e.g., Paid, Partial, Pending, Due).
- Sale Note – Optional notes or instructions related to this particular sale (visible on print).
- Staff Note – Internal note for staff only.
After completing all necessary fields, click the Submit button  to save the sale.
Form Footer – Sale Summary
The footer section of the form displays an automatic summary of the sale. This includes:
- Items – Total number of products added to the order.
- Total – Combined total before tax, discount, or shipping.
- Order Tax – Calculated based on the selected tax rate.
- Order Discount – Total discount applied to the order.
- Shipping Cost – Shipping amount added.
- Grand Total – Final payable amount after all calculations.
Ensure all details are correct before submitting. Once submitted, the sale will be recorded and visible in the Sales Index page.
Sales Index – Action Options
On the Sales Index page, users can view a list of all recorded sales displayed
in a structured
DataTable. Each row includes an Action dropdown button  that provides several options to manage
individual sales (see Figure 5).
that provides several options to manage
individual sales (see Figure 5).
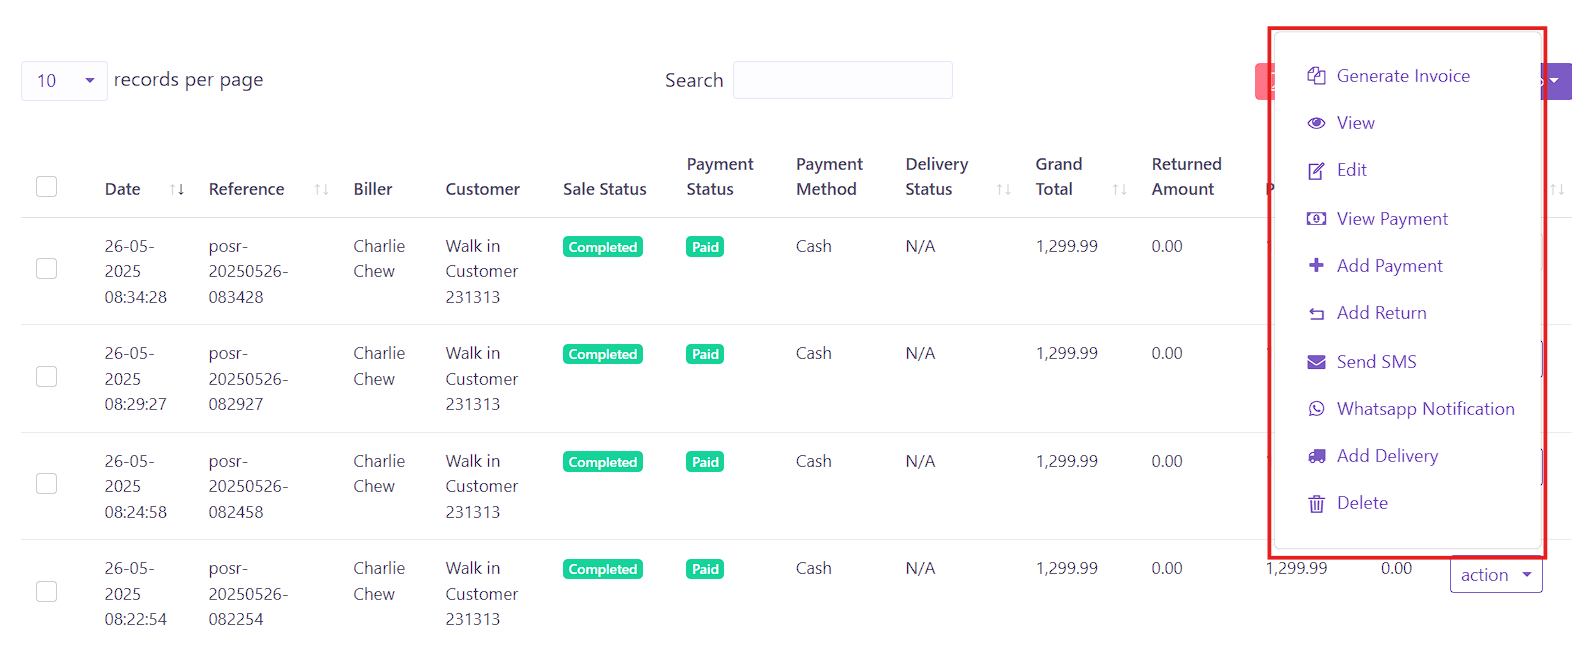 Figure 5: Action Dropdown in Sales Index
The following actions are available for each sale:
- Generate Invoice – Creates and downloads a printable invoice for the selected sale.
- View – Opens a detailed view of the sale, including customer info, product list, and totals.
- Edit – Opens the sale form in edit mode, allowing users to update the sale details.
- View Payment – Displays the payment history associated with the sale.
- Add Payment – Allows users to record a new payment for the selected sale.
- Add Return – Initiates a return process for the sale, allowing users to return specific items.
- Send SMS – Sends an SMS notification to the customer (if SMS gateway is configured).
- WhatsApp Notification – Opens WhatsApp Web or app to send a pre-filled message to the customer.
- Add Delivery – Assigns or records delivery information for the sale.
- Delete – Permanently removes the sale record from the system (only if permitted by role permissions).
These options help users efficiently manage and monitor individual sales, ensuring seamless post-sale operations.